Showing posts with label baby. Show all posts

Thursday, August 28, 2008

Baby Mary Janes


Ok -- I was wrong. I have another post before the move :o)

In February, I posted some baby items that I made for my future niece who was due in March. She took her time and arrived on April 1st, an April Fool's

Now that she's almost 5 mos. old, she is able to fit the mary janes that I crocheted for her!

The mary janes I made were loosely based on a pattern found in this booklet. (I have trouble following directions!)

Here is the lovely Liliana modeling her mary janes!


Tabby Cat Hat and Fall Daisy Scarf

I'm in the process of packing and sorting and tossing and selling and donating stuff so that I can make the move from TX to PA.

Along the way, I have made several full car trips to Goodwill and have also donated three GIANT trash bags of YARN to two different local charities. One charity gives the yarn to 5th graders who are taught how to knit after school. They make items for preemies in the hospitals. It helps give the kids something positive to do while learning an awesome hobby. The charity donations are coordinated by Stacey who owns and runs The Knitting Nest in South Austin. I've been to The Knitting Nest a number of times. It's a great place with a wonderful selection and plenty of space to sit and stitch.

The second charity gives yarn to knitters and crocheters who make hats for cancer patients both in the hospital and at home. The donations for that charity are coordinated by Susan who owns and runs Yarnorama in Paige, TX. I hadn't been out to Paige before and I felt like such a city girl. It was a long drive and the town is very small. But, the shop is great. The selection is very extensive. There is plenty of space to sit and stitch as well as a cafe with coffee and treats. I was impressed & wanted to purchase all sorts of beautiful fiber... I had to remind myself that I was there to donate yarn - not accumulate more!

It's weird being somewhat stash-free. I did save a few skeins, but for the most part, I have no stash right now. I'm sure that before I know it, I will have a giant, ridiculous stash again... it feels great knowing that the yarn is going towards people who will really appreciate it and will be worked into projects that will brighten someone's day.

Anyway-- I had a few projects I wanted to finish before the move. I still have one more to go (it's about 3/4ths done)... and will post pictures when it is complete.


These are the projects that I finished this week...

Matching Tabby Cat Hats for Baby and Mama

My friend Audrey commissioned me to make her two hats. One for her sister and one for her sister's baby-to-be. The idea was to make them look like orange tabby cats - complete with cat ears - because her sister has been looking for an adult hat with ears for awhile now. The baby and mama hats would match -- and would be given at the baby shower.

I hunted around for the purrrrfect orange tabby yarn and found Vanna's Choice Tangerine Mist. Of course, after going to every Michaels and a few Hobby Lobbys in the area-- I still couldn't find this color. So Audrey ended up ordering it online for me--which worked out well.

Anyway-- eventually (in a month or so), I hope to post pictures of the mama and me coordinating hats. For now, here is a picture of me modeling the mama hat. The baby hat is identical (well, smaller, but same stitch and border) with the addition of earflaps and ties that look like cat tails. Both are my own design... but there are tons of cat hats out there in knit and crochet if you are looking for a good pattern.


Fall Daisy Scarf

My other project was for my friend Dana. She loves wearing warm oranges and yellows and I wanted to make her a scarf as a thank you gift. I bought some Vanna's Choice yarn in assorted fall colors from Michael's and used the daisy square that I made as an addition to my friend Kate's blanket for inspiration. The daisy square pattern can be found here, though, I did modify it some for this scarf. After I made several squares, I stitched them together and then did an improvised border in a shell stitch. The scarf is very long and thick and warm - I'm really happy with it. Once it was finished, I washed it with fabric softener and it feels amazing.

Here are the pictures -- they aren't awesome because the scarf isn't modeled, but will give you an idea of it. For the first picture taken in my cube, the scarf hadn't been washed & blocked yet... and yes, those are ends that had yet to be woven in... but I couldn't resist taking a picture of the progress. :o)


Thanks for looking! I'm not sure that I'll be posting again until after the big move.

Friday, May 16, 2008

7 Bridal Party Handbags

As I mentioned in an earlier post, I was asked to make some handbags for Devon's Bridal Party. She and Dan are getting married THIS WEEKEND which is exciting and wonderful. I'm super-happy for them!
I made the test bag (details in the above linked post) by shrinking the size of the handbag pattern from this book (bag is pictured on the cover). My good friend Nicole helped me out with the tough spots and the test bag ended up turning out very cute. So I figured that the actual bags would be no biggie.

whoops ;o)

Devon was sweet enough to send me the fabric that she wanted me to use -- which was a huge help so that I didn't have to stress over whether or not the bags would match the dresses properly. The fabric was beautiful - a textured, loosely woven silk with turquoise and pale green flowers and a satiny-off-white. The "wrong-side" of the fabric is the one that Devon needed me to use, though, since it matched the dresses better than the right side. Being a total beginner, I didn't know that this would pose much of a problem. But, alas, it made it a bit more difficult.

I went out and bought special needles for my machine that would sew silk and pinking shears.

The body of the bag looked fine, but the handles of the bags weren't quite as cooperative. With the small size of the handles and pulling them inside out and then sewing the tops, the loosely woven silk was fraying from the pressure. Apparently, using the wrong side was making it worse, as the textured silk was woven in such a way that the wrong side is the side that frays.

As sewing the handles together at the top is the last step, I saved this step for last in my assembly line. This means that I made all seven bags before I realized that the tops weren't looking so hot. And by not so hot, I mean, they were falling apart as I stitched them, and would probably get worse and fall completely apart just in time for the bridal party pictures.

Awesome, right?

Pictured below is the best out of the bunch, I apologize for the fuzziness of the picture. I was a bit crabby when I took it!


I stared at the 7 ghetto bags and tried to figure out a solution. This means that I wrote several whiny emails to Nicole begging her for advice. I thought about adding a bias tape seam around the handles and mouth of the bag... but the handles are so tiny in diameter, that it could end up looking even worse. Plus, bias tape is generally cotton, as Nicole reminded me. She suggested a french seam - which I knew how to do but didn't know that it had a name. But, unfortunately, the fraying was SO bad that there wasn't even enough fabric for it.

I looked at my 7 ghetto bags and was very sad - and worried about whether or not I could get them done in time for the wedding. Sure, I could send what I had to her, but they looked so pathetic looking. And let's face it, the pathetic-look doesn't generally go with the rest of the wedding decorations.

I started looking up hundreds of clutch bag patterns online and thought of just starting over with a new bag design.

At home one night, I was staring at the bags lying out on my coffee table, trying to will them to tell me what the solution was. While I was staring them down, I realized that the body of the bags was actually really cute. It was just the handles that were tragic and disasterous.

hmm.

I took my pattern cut out and cut off the handles. Then, I made the body of the bag only in the lining fabric, outer fabric, and batting. I took the handle pieces that I cut out and laid them on the fold of each of the fabrics and cut out long and short handles.

I sewed the handles into tubes and turned them right side out... I did a top stitch on the handles. Then, I sewed the handles into the tops of the bags.

Viola. No visible fraying.

For the other 6 bags I cheated and took the bags formerly known as Ghetto and cut off their handles. I made new tube handles for them and sewed them in.


Anyway, I hope that the bride and the bridal party are happy with the results. It was a great learning experience for me & I hope everyone likes them. Eventually, I'm hoping to get a few pictures of the girls carrying them to post up.

In other news, I spent last week in Seattle with family. It was great to hang out and veg with family and I got to meet my newest niece. Of course, all aunties think their nieces and nephews are brilliant--- but get this, my newest niece is already so very alert and actually smiles when you laugh. So sweet. She's so very interactive for a wee lil one month old!

It was great to get away. My allergies actually were completely clear the entire time I was there, which was a wonderful and welcome change.

Anyway, for the future nursery, here are some letters for decoration that I crafted. Just got the letters from Hobby Lobby and modge-podged pretty scrapbooking paper that I cut out to them. Cute and easy baby project-- if you are looking for a good gift ;o)

Friday, April 11, 2008

Duke's Baby Chucks


I made another pair of baby chucks this week for my friend Kimsey's brand new nephew Duke. I actually decided to make the soles of the booties differently than I made the other baby chucks I winged a few weeks ago. The reason why is that I was using a different yarn, which was softer, thinner, and makes a less sturdy fabric. The yarn I was using was from mill ends in a baby chennile. Supersoft, and perfect for baby booties, but just not as thick as worsted weight yarn.


So, I made the sole in rounds and added the toe. Then, I did the same upper (or hi-top) as I did before. I made the tongue of the shoe a little longer and more pronounced. Then, I decided to add a star logo like the all stars have. I made it by stitching in black 5 sc in the round and then a round of hdc in white. Then, I sewed the circle down to the shoe. It's kind of puffy (stuffed with the ends), but I like it.


Hooray for Auntie Kimsey!


Friday, April 04, 2008

LaRusso Lovebird Hat

Whilst measuring the noggin of one of my coworkers so that his wife could crochet him a hat with my help, another coworker asked if I'd be willing to make a custom hat for his baby. Of course, I love making baby stuff, but I was especially excited when he told me that he and his wife wanted a hat that looked like their lovebird. I thought it would be an interesting challenge and a lot of fun.

Together, we came up with this design of what the hat could look like.

The biggest concerns that they had were that I made 4 gray toes on the bird (to match their lovebird), included wings, and found a very bright green. Luckily, I still had some Caron Simply Soft - Brites in Limelight.


I did the main hat in half double crochet, with earflaps. Sizing-wise, the hat is currently a few sizes to big for her, as we're hoping that she can wear it comfortably next winter. Woven hats during an Austin Summer just don't work that well. The wings were made the same manner as the ear flaps, but larger and with a picot edge. The ties were done in long rows of half double crochet in a Red Heart Charcoal. The toes were made out of "X's" made also in half double. And the beak and the eyes were done in scraps of yarn in single crochet.


Here is the Lovely Lady in Her LaRusso Lovebird Hat


Isn't she adorable?

Monday, March 31, 2008

Cowgirl Booties

My friend & coworker Justin saw the cowboy booties that I made for a silent auction and asked if could make a pair for his niece-to-be. She is due in a few weeks, so I made them this weekend in Caron Simply Soft Pink and Red Heart Super Saver Buff. The Cowboy Booties pattern is one of the very few patterns that I actually follow without changing it up. Actually, maybe the only one! The booties are sized for a newborn and super-cute!


In other news, the Wags and Whiskers Annual Dinner Auction to Benefit the Humane League of Lancaster County was held on Saturday. It was a huge success and everyone had a great time. This morning, my sister sent me this adorable picture of the lucky recipient of the GI Joe dog sweater that I donated. His name is Mickey, isn't he adorable? ... er, I mean, isn't he super-tough in his camo?


Friday, February 29, 2008

Finished Pair of Chucks

I wanted to share the finished chucks that I will be donating to the silent auction at The Humane League of Lancaster County where my sister works. They are my own pattern (as mentioned below) and take very little time compared to other booties I've made. I think that another cute use for these would be to tie them together and put them over your car's review mirror instead of fuzzy dice...


Thanks for checking them out -- and happy Friday!

Monday, February 25, 2008

Baby Chucks


Recently, I taught my friend Nicole how to crochet. Since then, she has made two adorable baby sweaters (which hopefully I'll have pictures of soon). One sweater is in a pink that is sweet as frosting. The other is black for a friend who wanted some alternative baby clothes, much to the chagrin of her very traditional and conservative mother. To match the black baby jacket, she wanted to make some cute baby shoes. I hunted around online... and thought, what would be better than baby chucks?


I saw many knit versions online... but no crochet patterns.


She came over yesterday and we got started on a sneaker pattern that we hoped to modify into hi-top converses.

After an hour or so of making the soles, I realized that I wasn't loving the pattern. The result was that it looked a lot like the hi-top converse (I'll post a picture tonight of chuck model 1.0), but it was too big for a baby and just way too time intensive.


So we scrapped the plan.


I decided that a more abstract and less exact version would be faster, less annoying, and still cute. Basically, get the point across without trying to make a perfect copy. I drew up a schematic and we went to work.


The result was a bootie in 1/2 the time. I haven't added the star yet and didn't finish both booties, but thought I'd share the first one for now.


This pair will be added to the other donations I'm making for a silent auction to benefit The Humane League of Lancaster County where my sister works.

Thursday, February 21, 2008

Gifts for my Niece-to-Be

One of my sisters is due next month and I couldn't be more excited for her :o) Most likely, they will be having a lil' girl.. though, everyone knows that that is never 100%.


I started out wanting to make a few gender neutral items... but before long, I was making adorable mary jane booties.

I'm thinking that they can either cross dress the baby if it's a boy (yes, I kid)... or they can give the inappropriately gendered items to someone who is actually having a girl and I can stitch up some new items.


It started innocently enough with a baby blue cardigan... but then I wanted to add some trim and this beautiful lilac yarn was calling my name. Once I added it, I knew it screamed "girl".


Then, I wanted to make some cuff booties... and was eyeing my collection of baby yarns. This really soft, varigated baby yarn purchased months ago and used for this sundress for my niece Myla was calling my name.

I used a bootie pattern from Precious Baby Booties which I modified pretty minimally. The turned out a little lumpier than I wanted - but they are still cute. ;o)

Of course, Lily-Cat had to get in the preliminary shot (before I wove in the ends). She firmly believes that it is not a photo shoot unless her picture has been taken. I think she feels that she increases the value of those items pictured with her.

here they are, sans-cat.
Finally... the Mary Janes. Also from the same booklet... though, I changed these up a little more... Both sets of booties are tiny, with a 3 1/2" sole. I hope that they fit her feet!


Congrats again to Betsy and Andy... they are going to make such great parents! I can't wait to meet the new lil one!!!

Wednesday, February 20, 2008

Silent Auction Items for Q's Preschool

Last year, I crocheted a bunch o' hats for a silent auction that benefitted my nephew's preschool. As a long-distance auntie, you really look for any opportunity to get involved with your nephew's life.
So, when the auction came up this year, I was excited to partake. Of course, with a new lil niece (or nephew?) on the way, I had a lot of different projects in queue and couldn't commit to the volume that I donated last year.

But, I did what I could.

I made a baby hat and jacket set with beige trim. The navy yarn is almost denim-like, but I think is more of a tweed. It's washable and from some mill ends that my mom picked up. The jacket is sized for 6-12 mos. The hat is for a baby approx 9mos old (or with a head that is 19" around).

The body of the jacket is a hybrid of few patterns and some own touches-- honestly, I just looked at a few patterns and then picked what I liked from each one and then modified as I saw fit as I went along. The hat was just a standard hat in half double crochet... with a picot edge to match the sleeve edges.


Next up, a modified version of this hoodie pattern (which I also used for the dragon baby jacket for my nephew Atticus). I used Caron Simply Soft Yarn for the body and homespun for the edges. This one is sized for 18-24 mos.

Monday, December 31, 2007

Secret Christmas Projects Revealed: Dragon Toddler Jacket!

Well... now that my secret projects were given as Christmas Gifts, I can reveal them on here!
I was excited about both of these projects and it really was hard to not post about them...

First up: Dragon Toddler Sweater for my Nephew

Ages ago, I made a Dragon Baby Sweater. The orginal pattern was from the amazing Marnie MacLean... but it was in knit and crochet. When I made my version of the Dragon Baby Sweater, I used a hoodie from a book that I had.

For this updated version, I used this pattern from Caron for a hooded baby jacket .

Per usual, I didn't follow the pattern exactly. The changes I made were to not crochet in the back loop only and also to not skip those stitches... I wanted it to be totally solid so I could sew on the "spots". I also edged it with a picot edge... and then added spots and a crocheted tie. For the original, I did ears like the ones on Marnie's pattern.. but for this one, I went with "Shrek-style" ears. The spine on the back of the jacket is an improvised wave/shell stitch. I used Caron Simply Soft in Dark Sage and did the accents in Dark Country Blue.

I was so worried that it wouldn't fit... but luckily it was the perfect size and my nephew was able to wear it during Christmas!


yay!

Saturday, December 22, 2007

Christmas Sneak Peeks

This is a very special sneak peek at some of my Christmas Projects this year. I will post full pictures after the gifts have been given...


Sneak Peek : Skirts

5 wrap skirts one for each sister and one for my sister-in-law. They get to decide who gets what. Full pic of each skirt after they are given - for now a glimpse of each fabric with the trim. Secret Gift #1:

Whatever could it be?

Secret Gift #2:
hmmm...


I hope everyone has a great time celebrating the holidays.

Thursday, November 29, 2007

Silent Auction + Benefit Concert for the Mexican Flood Victims

Some of my crocheted items will be auctioned off during this concert to benefit the Mexican Flood Victims...

good music + fun people + great cause = super happy fun time

Mexican Flood Benefit Concert

Threadgills

Sunday - December 2nd
2 p.m. to 7p.m.
301 West Riverside Austin, Texas
2 p.m.: Southpaw Jones
3 p.m.: The Daze
4 p.m.: The Harold Ambler Project
5 p.m.: Sam and Henry
6 p.m.: The Shelley King Band

Hosted by your emcee, Spike Gillespie.
Silent art auction.
Admission $10; $5 for 18-and-under.
about:
On Sunday, December 2, local musicians, artists, and businesses are holding a benefit for the victims of the recent flooding in Tabasco, Mexico. Although no longer in the news, Tropical Storm Noel and its aftermath have left devastation in Mexico that will take months and years from which to rebound. In addition to damaging the homes of almost a million people, or about half of Tabasco's population, the flood also devastated crops of corn, bananas and beans that provide the livelihood for thousands.

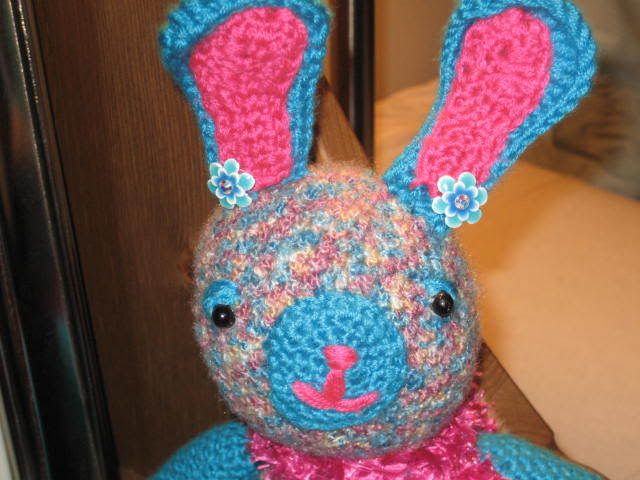
For Adoption during the Auction: Miss Bunny


Miss Bunny is a freehanded crochet doll complete with Swarovski Crystal earrings. Fancy!

The varigated yarn is actually Belgian yarn that my Aunt Kathy gave to me. She bought it years and years ago - and like any yarn that's taken care of, it's in excellent condition.

The solid color yarn is in lion brand microspun... and the scarf is in fancy fur novelty yarn.


The majority of Miss Bunny was done in single crochet... with the exception of parts of the heart and part of her ears. She is 100% one of a kind.


Also up for auction...


The cutest lil' boots in Texas!


Adorable Cowboy Baby Booties for a brand new Native Texan ;)


They are soo tiny and cute. I want to make a ton of pairs in every color. These were done in Caron Simply Soft Chocolate and Red Heart Buff yarn. I actually followed a pattern for once... and was impressed with myself for not changing it up too much ;)

If you are in Austin - please try to come on Sunday!


Friday, September 21, 2007

Scrapghan for My Dad

Hello!


The week of my dad's birthday (July 29th), I decided to make him a blanket. I had made him one hurriedly the last time I visited that I was not impressed with. I really wanted to take the time to make him something that I thought would better suit him.


I had skeins and skeins of yarn of various colors that I thought could potenially work well together and I realized that a scrapghan might be both a good stashbuster and something that would look more interesting.


I went through my stash and found mostly cool colors that were more masculine (somehow, I didn't think fuscia fun-fur would float my dad's boat). I ended up with about 14 colors that I thought might work and decided that my Caron One Pounders of Navy would be a good main color.


I looked through my books and decided to make the scrapghan in the double wave stitch from Donna Kooler's Encylopedia of Crochet (my favorite resource for stitch descriptions). I took her explanation of the stitch and just multiplied it out for the length that I wanted it to be (long enough to cover a full sized bed). After I was about halfway done, I found this awesome pattern by Dot called Scrumptious Scraps Afghan... which is not the same (she has an extra row that I don't have- and hers is horizonatal instead of vertical)... but if you are looking to do something similar, I think her pattern is really cool! Most importantly, she explains how to do the Russian Join... which I sooooooooo wish I had learned before I started this bad boy. I mean, check out these evil demon ends (picture at left). For those of you that don't stitch, all of those ends must be woven into the blanket when you are finished (unless you choose to make fringe). Those ends took me several hours to weave in and it's pretty mindless/tedious work.


To be honest, when I started this, it just looked hideous to me... and I started refering to it as the ugly blanket! (sorry, Dad!). The very beginning, it just looked odd. Didn't quite blend well and I really wasn't sure if I was going to finish it! Though, the ugly blanket and I had good days and bad days. Some days, I looked at it and thought, What was I thinking?


Other days, I lay it out on the bed and just ran my hands over the texture and loved it. So, we had a love/hate relationship. This blanket was also my biggest project to date. I have done blankets before that were equal in size to this one, but this one was the most time intensive. I used a smaller hook (I) and mostly worsted weight yarn. In other blankets that I have made in just a few hours, I used a larger hook and either thicker yarn or multiple strands of worsted weight. Staring at the blanket over a period of a few weeks, there were times when I really questioned myself and the way that it was turning out. I was worried that the Ugly Blanket was getting Uglier instead of coming together.


Here is a picture of the blanket laid out on my bed when I had about 2 feet left to do.


Of course, the completed blanket really came together and it does look good. But I gotta tell you, there were days along the epic journey of the blanket where I almost stopped and started a new one.


But... I'm glad I did it. Beacause it actually looks good finished... and more importantly, my dad loves it.

Here are my cats testing out the nearly complete blanket (just prior to me making a border of 1 row of Single Crochet and 2 rows of double crochet). And yes, this blanket heretoforth will no longer be refered to as the Ugly Blanket ...

Of course, my dad is uber allergic to my fluffy kittens, so I washed it very well before I sent it :)

Because the worsted weight yarn was a bit rough (I used a lot of Red Heart yarn from my stash), I washed the blanket with fabric softener and also used 2 dryer sheets. The result is a very snuggly blanket!

My dad received it yesterday and is really happy with it! I guess it's just getting a little cooler in North Carolina, so he's looking forward to wrapping it over his shoulders for evening reading. He said that the stitches were very mathematical (uh, leave to my dad to see the math!) and he was happy to extend the celebration of his birthday a few months ;) .

So yay! Scrapghan Complete! Finished size? Large enough to top a full sized-bed... defintely perfect for my mom and dad to snuggle under while watching a movie. Total time? I think at some point, each color + main color (4 rows) were taking me just over an hour each.


I also just received pics of a hat that I made over a year ago for a friend of mine who was expecting! Here is the post from last June when I made it. Her little girl is now a year old and this hat hasn't fit her since her first week :o)


But, I thought I would share the pic of her wearing it!

Sooo cute!!!

Thanks for reading :o)


Tuesday, September 18, 2007

Bragging Rights...


My nephews and niece are obscenely cute.


evidence follows...


Oh...


and ACL is Fun!


Here is a pic of the newly engaged Andrea and Evans at Austin City Limits - a 3 day music festival...


and here is a not-so candid very myspace pic of me and my buddy grant